Showing posts with label recipe. Show all posts

Monday, September 26, 2016

Soy Sauce Chicken

My sister recently came to visit me for an extended weekend. I decided to make a simple dinner at home since she was arriving into town after a 8+ hour drive. On the menu was a summery watermelon arugula salad and soy sauce chicken with rice.

I had my soy sauce chicken sauce which I keep in the freezer.  This is how I think lo sui sauce is made. The literal translation for lo sui is "old water". The chicken imparts flavor and collagen into the sauce as it cooks. The reduction and collagen thickens the sauce with each use. With so much soy sauce and the fact that it is frozen and then reboiled each time, I've never been concerned about the sauce turning.

My sister loved having steamed white rice mixed with the braising sauce so much that she made herself at least 1 bowl for each day of her visit.

Soy Sauce Chicken
1 tsp cooking oil
3 slices ginger
2 stalks green onions/scallions, cut into 2-inch pieces
1 cup regular soy sauce
1 cup dark premium soy sauce
1/2 cup water
3 tbsp Shaoxing wine
2 tbsp rock sugar or white sugar
1 star anise pod or 5 star anise seeds
1/4 tsp five spice powder

4 pieces of chicken legs or thighs, skin-on and bone-in
peeled hard boiled eggs (optional)

Heat up cooking oil in a pot. Stir-fry ginger and green onions/scallions for 2 minutes or until fragrant. 
Add regular soy sauce, dark premium soy sauce, water, Shaoxing wine, sugar, star anise and 5-spice powder. Bring to a boil for 3 minutes.
Add chicken pieces and bring back up to a boil for 2 minutes. Reduce heat to a low simmer with lid on but propped up slightly for steam to escape. Cook on low simmer for 1 hour. Turn the chicken every 15 minutes if not completely submerged in the liquid.
Set chicken aside on serving platter. Strain braising sauce and discard the solids. 
*Optional: Marinate hard boiled eggs in the braising sauce to make soy sauce eggs! Just let the eggs sit in the sauce overnight in the fridge.
Pour braising sauce into a freezer safe container, leaving 1 1/2 inch of space from the top of the container. Let cool and store in freezer for next time. The flavor and viscosity of the sauce will improve with each use. Just add more soy sauce and water (2:1 ratio) if the liquid reduces too much over time.
There will be a layer of fat floating on top of the sauce. That will form an air-tight seal and protect the sauce from freezer burn. You can scrap it off before reheating next time.

Sunday, October 19, 2014

How to Prepare Live Sea Urchin


I scored a live sea urchin at HMart the other day and decided that it was time for me to rise up to the challenge of preparing live sea urchin.  I have seen the guy at the farmer's market do it, it seemed doable.  Turns out, it's very doable.
Step 1: Pick out a live sea urchin.
Step 2: Don a pair of gloves and find a pair of sturdy kitchen shears with a sharp point.
Step 3: Flip the sea urchin so that the closed opening side is up. That is the mouth.
Step 4: Carefully make a small crack near the mouth.  The shell will be hard, but is just about twice the thickness of an eggshell.  It won't take much to crack.  Cut a circle around the mouth to remove it.  
Step 5: Cut a slit in between each of the sections of golden uni tongues.
Step 6: Carefully peel off/cut away what if left of the top of the shell without nicking the uni tongues.
Step 7: Drain away the liquid inside.
Step 8: Carefully remove as much of the slimy black membrane as you could without nicking the uni tongues.  I tried using chopsticks for this, but it was too slippery.  Bare fingers work better.  Though it stains your fingers, a good scrubbing with some dish soap got most of it off.
Step 9: Use a spoon to carefully remove the uni tongues from the shell and peel away any remaining black membrane still stuck on the tongues. rinse under a gentle stream of cold water.
Step 10: Enjoy immediately.
Stuff this good is best treated with simplicity.
I opted for draping two tongues over sushi rice with strips of nori, a small Uni Don as my appetizer.  
The rest of the tongues, I made a simple Uni Pasta as my main course.

Uni Don


Uni Don
1/4 cup cooked sushi rice, slightly cooled
1 tbsp rice vinegar
pinch of sugar
2 tongues of uni
4 strips of nori

Mix the rice vinegar with the sugar in a bowl until dissolved.  Mix in sushi rice.  Top with uni and nori strips.

Uni Pasta


Uni Pasta
3 tongues of uni
1 tbsp olive oil
1 serving of hot, cooked linguine, fettuccine or spaghetti
1 tbsp of flat leaf parsley
1 tsp fresh lemon juice
sea salt, to taste

Whisk uni and olive oil together in a bowl until liquified and blended.  Toss in pasta, parsley, lemon juice and sea salt.

Sunday, October 12, 2014

Steamed Pork with Tianjin Preserved Vegetables


Steamed Pork with Tianjin Preserved Vegetables
I was feeling nostalgic for some steamed pork with Tianjin preserved veggies and rice the other day.  Just a bit of Tianjin preserved veggies goes a long way.  The steps and most of the ingredients for this dish is the same as Steamed Pork Patty with Shrimp Paste, except for the shrimp paste.  Last time I spoke with my mom, she let me in on the secret.  Slamming the pork into a bowl for about a dozen times gives the finished product a nice "bounce" when you bite into it.


Steamed Pork with Tianjin Preserved Vegetables
1 lb ground pork
1/2 tbsp Tianjin preserved vegetables, fine chopped
1 stalk green onions/scallions, minced (green parts only)
Mix the pork and Tianjin preserved vegetables together and form into a ball.  Hold a metal bowl steady on the counter.  

As hard as you could, slam the mixture into the bowl. Repeat a dozen times.
Form the pork into a ball.  Flatten it into the bowl.  Set bowl in a pot of water that just reaches the bowl's half way point. Sprinkle the green onions over the top.  Cover and steam for about 30 minutes after the water starts boiling or until the meat is no longer pink. Serve over rice.

Wednesday, August 27, 2014

Ossobuco Style Beef Shanks

Ossobuco Style Beef Shanks
I scored some beef shanks at Zion market for a super great price at the same time that I was shopping for beef marrow bones for stock.  Beef shanks are lean and tough, but also extremely flavorful.  Meat like this is perfect for braising.
Why would I want to cook a dish that will heat up my tiny apartment in this heat wave?  Because I really like bone marrow and fall-off-the-bone-tender beef.  Especially when it comes with a luscious sauce like this one.  The braising liquid is thickened by the collagen that is naturally abundant in this cut of beef.  It will coat the back of a spoon without the addition of thickeners or roux.  

Fall off the bone tender
And because I am going to cut down the cooking time with my pressure cooker.  Next to my grill, it is my second most used cooking appliance in the summer. It is a crazy, irrational home cook's best friend. It cuts down on cooking time for recipes that call for a slow braise, which breaks down the collagen in the meat, which in turn makes the meat tough and the braising liquid thicker.  That is one mouthwatering domino effect, isn't it?
Ossobuco traditionally uses veal and white wine.  However, I think red wine stands up to the more robust flavor of beef much better.  The acidity from the red wine and tomatoes helps tenderize the meat as well as infuse intensely complimentary flavors.  
By the way, only use wine that you like to drink.  It doesn't have to be expensive, it just has to be good.  And good means that you like the way it tastes.  Not sweet though.  The reason to cook with wine is to impart its flavor onto the dish.  If you don't like the wine in a glass, you won't like it in a dish.
Enough talking, start cooking.

Ossobuco Style Beef Shanks
1 lb beef shanks, butcher cut 1-inch thick
2 large tomatoes, diced
1/2 yellow onion, diced
2 garlic cloves, minced
1 cup red wine
1 cup beef stock (can sub with chicken stock), unsalted
salt & pepper
1 tsp beef tallow or cooking oil

Coat the beef shanks with salt and pepper.  Heat the beef tallow or cooking oil in the pressure cooker.  Sear the beef shanks on all sides.  Set beef shanks aside.
Cook the onions over medium heat in the pressure cooker until translucent, scraping at the bottom of the pan with a wooden spoon.  Stir in garlic and cook for another 2 minutes. 
Add beef shanks, diced tomatoes, red wine and beef stock to pressure cooker.  Arrange the beef shanks so that it is covered by all the other ingredients.
Lock the lid on pressure cooker according to instruction manual.   Bring heat up to high to build up to high pressure.
Reduce heat to medium-low for 30 minutes.  
Turn off heat and let pressure reduce on its own for another 30 minutes.
Carefully remove lid.  Serve braising liquid over rice, risotto, mash potatoes or pasta.

Saturday, August 16, 2014

Goat Milk-Braised Pork Loin

Goat Milk-Braised Pork Loin
This recipe traditionally uses regular cow milk.  However, I had goat milk in the fridge.  Goat milk is thicker and has a tangy flavor.  It is also easier on the stomach for those who have lactose sensitivities.  The gravy from the braising liquid is delicious over rice or mashed potatoes.  You can either leave the milk curds as is or blend it up into a smoother sauce.  Tasty either way.  The acid from the milk and slow braising makes the pork loin fork tender.

Goat Milk-Braised Pork Loin
1 lb pork loin
1 1/2 cup goat milk
1 tbsp avocado oil (or any cooking oil)
salt & pepper
small pot with lid, wide enough to fit pork loin

Lightly season the pork loin with salt and pepper.  Coat bottom of pot with oil.  Heat over medium-high heat.  Sear the pork loin on all sides until light golden brown.  
Add goat milk.  Bring to a boil.  Reduce to a gentle simmer and cover.  Allow to simmer for  2 hours.  Turning the pork loin every 30 minutes.

The braising liquid should have a golden brown tint.  Milk curds would have formed.
Carefully transfer the pork loin onto a serving platter and allow to rest for 10-15 minutes.

Optional step: Allow the braising liquid to cool enough to blend.  Unless you are using a handheld blender, hot liquid will expand in your blender and you'll have a gravy explosion coming out of your blender.  Pulse 4-5 times in a blender or until smooth.

Pour the gravy into a gravy boat or small bowl with a spoon.

Slice the pork loin against the grain into 1 inch thick slices.  Serve with the gravy.

Saturday, August 2, 2014

Spinach & Mushroom Lasagna Rollatini

Spinach & Mushroom Lasagna Rollatini baked after frozen

I love dishes with white sauce and lots of ricotta.  I will opt for the often vegetarian white pizzas or lasagna dishes, ignoring my carnivorous bloodlust for animal protein in exchange for the delectable combination of  ricotta, cream and mushrooms.  Sometimes these dishes include chicken.  I do not find that it does anything to enhance the overall flavor or texture of the dish.  In fact, I prefer not having the addition of the usually dried out chicken pieces.  I'll order a side of wings or something to satisfy my need for meat.  Or preferably add a fried egg to whatever white pizza or pasta dish (I call that reason for leftovers).
Rollatini requires a bit more effort, but I find that it is much easier to serve.  My lasagna slices always fall apart when I scoop them onto a plate.  Can't have sloppily plated food, now can we?
However, if you are not in the habit of photographing your food, you can just use this recipe to build a regular lasagna.
This recipe can be divided into smaller portion sizes and freezes beautifully.

Spinach & Mushroom Lasagna Rollatini
9 oz dried lasagna noodles
2 lbs spinach leaves, lightly chopped
2 lbs white button or crimini mushrooms, thinly sliced
1 small onion, diced
1 tsp butter
Avocado oil (or any cooking oil)
2 cups heavy cream
1 lb mozzarella
1 16 oz tub ricotta
1 egg, beaten
1 tbsp dried tarragon (double if fresh)


Cook the lasagna noodles in boiling salted water for time specified on package.  Strain and lay flat to cool once cooked.
While lasagna noodles are cooking, shred the mozzarella with a grater.  Divide into 2 Set aside.
Lightly blanch the spinach leaves by dunking them in boiling water for a minute and then quickly straining.  Set aside to cool.
Add just enough oil to a large and heavy sauce pan to cover the bottom.  Heat over medium heat for 1 minute.  Add sliced mushrooms and spread evenly.  Do not disturb the mushrooms until all the liquid has evaporated and browned on one side.  Stir and cook for another 5 minutes.  Place mushrooms in a bowl and set aside.  Do not clean the pan.
In the same pan that you cooked the mushrooms, add butter and onions.  Cook over medium heat until translucent, stirring occasionally.  Add heavy cream to the pan and simmer for about 15 minutes or until the cream coats the back of a metal spoon.  Add 2 tbsp of the browned mushroom to the cream sauce.
Mix ricotta, tarragon (rub the tarragon between your palms to release the aroma) and beaten egg together until well combined.
Preheat oven to 350 degrees Fahrenheit.
In a 9x13 inch baking dish, spread a thin layer of the mushroom cream sauce evenly on the bottom.
On a flat surface, lay out one sheet of lasagna noodle.  Spread an even layer (doesn't have to be too thick) of each in the following order:
  • ricotta mixture 
  • shredded mozzarella (from first half of mozzarella)
  • browned mushrooms
  • blanched spinach
Carefully roll up the noodle and place in the baking dish.
Repeat with rest of lasagna noodles.  Evenly sprinkle the rest of the mozzarella over the top of the stuffed noodles.  Spoon the rest of the cream sauce over the top of the dish.*  Cover loosely with foil.  Bake for about 40 minutes.  Remove foil and bake for an additional 10 minutes or until cheese is browned at the edges.

*At this point, you can wrap the dish tightly with plastic wrap and again with a layer of foil to freeze for up to 3 months.  To bake from frozen, remove the plastic wrap and loosely cover top of dish with foil.  Bake in a preheated to 400 degree Fahrenheit oven for 1 1/2 hours.  Remove foil and bake for an additional 30 minutes.

Sunday, March 23, 2014

Salted Caramel Apple Pie

Salted Caramel Apple Pie w/ Lattice Top
Thanks to That's So Michelle's recipe for Caramel Apple Jello Shots, I had a ton of peeled Granny Smiths sitting in my fridge.  Since they were the pricier organic variety, the frugal imp inside me just can't allow them to be thrown out.
Apple sauce or apple butter would have been the easiest way to go.  I almost did until a lightbulb of an idea went off in my head.  The Caramel Apple Jello Shots were so great, why not caramel apple pie?  And why not a salted caramel apple pie?
I had never baked a pie from scratch before.  I looked through my recipe books and my first attempt was a disaster.  The top crust was great, but my bottom crust had absorbed too much liquid from the filling and had become a soggy, gooey mess.  So I very carefully cut and lifted the top crust, spooned the filling into bowl and started all over again with the bottom crust.
On my second attempt, I pre-baked the bottom crust and sealed it with a layer of egg whites.  I then spooned the filling back into the bottom shell, added the top crust and "glued" it back to the edges of the bottom crust with egg whites.
The operation was a success!  It was crucial to keep the dough cold until the moment it goes into the oven.  I kept putting it back into the refrigerator after each step of handling.  All that work was worth it.  Both the bottom and top crust turned out delightfully flaky.
And I didn't even realize that the next day was Pi Day.
What was meant to be was meant to be.

Double Pie Crust
2 1/2 cup flour
1 1/12 sticks cold butter, cut into cubes
1 tsp salt
4 tbsp ice water
In a large mixing bowl, combine flour and salt.  Using a pastry cutter or 2 knives, cut the butter into the flour mixture until butter is about pea-sized and the flour is coarse.  Refrigerate for at least 20 minutes.
While tossing the flour mixture around, sprinkle in the ice water evenly.  Take a handful of the crumbly mixture and squeeze it together.  If it doesn't hold, sprinkle in another 1/2 tablespoon of ice water.
Divide the dough into two equal parts.  With the heel of your hand, squish each of part the dough into
1/2-inch thick disks.  Refrigerate for at least 1 hour.

Salted Caramel Sauce
1/2 cups sugar
1/4 cup butter, cut into cubes
1/2 cup heavy cream (or evaporated milk), warmed
1/2 tbsp sea salt
Use a large and heavy saucepan that holds at least 2 quarts.  Spread sugar evenly to cover the bottom of the sauce pan.  Over low heat, stir the sugar with a wooden spoon or whisk as it melts.  Stop stirring once most of the sugar is melted and swirl the melted sugar around the bottom of the pan.  Continue swirling and cooking the sugar until it is a deep amber color or 350 degrees F.
Carefully add and stir in butter.  The mixture will bubble violently.
Remove the pan from heat.  Slowly add the cream or evaporated milk.  The mixture will bubble a lot.  Stir until the mixture is smooth.  Stir in sea salt.

Salted Caramel Apple Pie w/ Lattice Top
3 lbs Granny Smith apples (peeled, cored and sliced into 1/2" thick)
Salted Caramel Sauce
1 egg white, slightly beaten
Double Pie Crust
Fill a large pot with 4 cups of water.  Bring water to boil.  Add apple slices and stir.  Remove from heat.  Cover pot with a lid for 10 minutes.
Drain the apple slices and let cool.
Take one of the disks of pie crust out of the refrigerator.  On lightly floured waxed paper, roll the disk into a 12-inch circle.
Lightly dust a 9-inch pie pan with flour.  Carefully place the dough into the pie pan.  Gently press the dough into the pie pan, just enough so that it lines up with the bottom and edges.
Prick the bottom of the dough several times with a fork.  Trim the edges, leaving 1/2-inch of excess dough from the edge.  Flute the edges of the dough by pinching them between your thumb and index fingers.  Refrigerate for at least 30 minutes.  Preheat the oven to 350 degrees F.
On lightly floured waxed paper, roll the other disk into a 12-inch circle.  Remove the waxed paper from under the dough.  Slice the dough into 1/2-inch wide strips.  Place the waxed paper on a large plate or cookie sheet.  Carefully place the strips on top of the waxed paper. Refrigerate for at least 30 minutes.
Lightly press a sheet of foil onto the bottom crust.  Fill the pan at least 2/3 full with dry beans or pie weights.  Place the pie pan in the oven and bake for 10 minutes.  Remove the beans or weights and foil.  Brush the bottom of the pie crust with egg whites to create a seal.  Cover the edges with foil.  Return to oven for another 10 minutes or until golden brown.  Remove from oven and let cool.
Mix apples with caramel sauce until well coated.  Add apple filling to cooled bottom crust.  Remove dough strips from refrigerator.  Drape the strips over the top of the apple filling, forming a lattice pattern.  "Glue" the edges of the lattice top to the edges of the bottom crust with egg whites.
Brush the lattice top with egg whites.  Bake for 15-20 minutes or until top crust is golden brown.
Remove from oven and allow to cool on a rack.

Saturday, February 22, 2014

Shrimp Stuffed Tofu

Shrimp Stuffed Tofu
I seem to be on a tofu kick lately.  Most people say that they don't like tofu because of it's texture and bland flavor.  That always puzzled me because all the tofu dishes I grew up eating, which were home cooked thanks to my mommy, were flavorful and had varied textures depending on the dish.  Tofu acts like a sponge and soaks up any sauce that it is cooked in.  Even the plain ones that are simply deep-fried taste great to me when it is served with dipping sauce.
There are many different types of tofu available (egg tofu, soft, silken, medium, firm, tofu skin, etc.)  Combined with the vast possibilities of cooking method (chilled, steamed, braised, pan-fried, deep-fried, stir-fried, grilled, pressed, frozen-thawed, etc.), the variety of texture grows exponentially.
Maybe I just have weird tastes.  Or maybe most people didn't have the luxury of a cook like my mom to introduce them to tofu and unfortunately came to know poorly prepared tofu.  Even some restaurants do not do their tofu dishes justice.  It sometimes seem like it's just on the menu to be there.
In any case, this one is amongst my favorites.  I love the texture of silky soft tofu with steamed rice.  If you do as well, this is the dish for you.
My mom also sometimes uses ground pork for the stuffing, which I will get into another time.

Shrimp Stuffed Tofu
1 block of soft tofu
fine sea salt
cornstarch for dusting
10-12 large shrimps, shelled
1/3 tsp white pepper
1/2 tsp cornstarch
1/2 tbsp minced green onions
1/2 tsp sesame oil
1 tsp soy sauce

Prepare tofu:
Cut tofu into 1 1/2 inch cubes.  Make a well in the center of each cube by scooping out the middle with a metal spoon.  I used the spoon to make 4 cuts on the top of each cube, slightly angling the cut towards the center.  Be careful not to break the sides of the tofu.
Lightly sprinkle sea salt over the hollowed tofu cubes.  Turn each cube upside down.  The salt will soak in and the tofu will drain any excess liquid while you prepare the shrimp filling.

Prepare shrimp filling:
Now you may wonder why I would do this by hand, rather than utilize a food processor to pulse the shrimp into a paste.  For one thing, because my momma said so.
And...I find it difficult to maintain enough control with a food processor to keep the shrimp from ending up being too mushy.
Using a heavy meat cleaver or santoku knife, chop the shrimp up into little pieces. Mince the shrimp until the texture is like a thick paste with bits of shrimp mixed in.
Transfer the shrimp into a bowl.  Stir in a pinch of sea salt, 1/2 tsp cornstarch and white pepper.  Mix well.

Flip the tofu cubes hollow-side up again.  Very lightly dust the wells of the tofu with cornstarch.  Don't over do it, otherwise, you'll end up with glue inside the tofu.  This will help the shrimp stuffing stick to the tofu.
Scoop the shrimp filling into each tofu cube.  Place each shrimp-filled cube onto a heat-proof dish with raised sides.
Fill wok (or a large pot that is at least 1-inch wider in circumference than the dish) with 2-3 inches of water.  Place a steam rack in the wok or pot.  Place the dish on top of the rack.  Make sure the water does not reach the top of the dish.
Cover the wok or pot with lid.  Steam for about 10 minutes or until the shrimp turns pink.
Drizzle with sesame oil and soy sauce.  Sprinkle with green onions.
Photograph and post pictures.  Serve with steamed rice and enjoy!

Wednesday, February 12, 2014

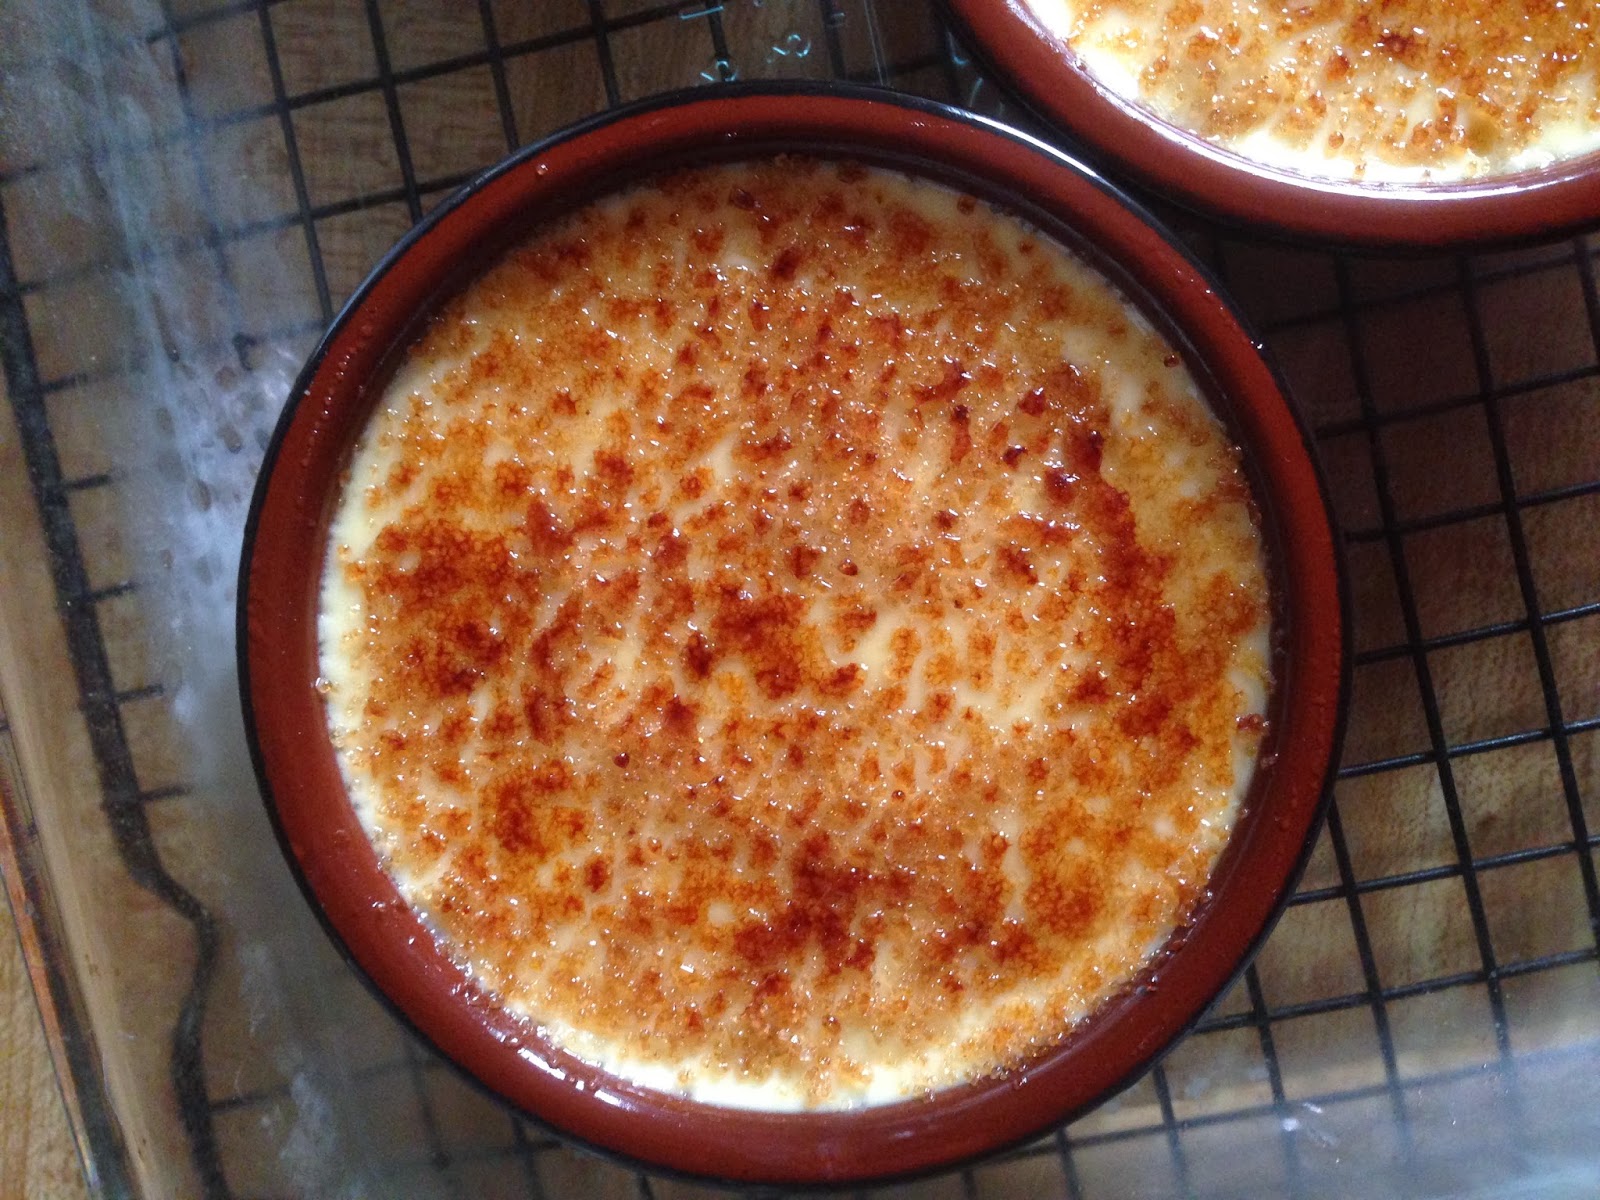
Lemon Créme Brûlée

Lemon Créme Brûlée
My Superbowl potluck dish this year is not any type of wings, dip or chili.
I had purchased a kitchen torch a few months ago and have been itching to make créme brûlée.  When my friend decided to host a small Superbowl get together, I immediately said that I will take care of dessert.  The recipe called for 6 eggs yolks to 3 cups heavy cream.  I think the custard turned out a little loose.  I decided to up the egg yolk to heavy cream ratio.
The recipe that I had altered promised 6 servings, but serving size depends on the size of your ramekins.  I suggest filling your ramekins up with water and then pouring the water into a measuring cup to figure out how much custard you need to make. Instead of vanilla bean, I opted for a bright lemon flavor instead.  The amount of sugar was also cut down since I am not a fan of overly sweet desserts.

Lemon Créme Brûlée
(makes about 3 1/4 cup custard)
3 cups heavy cream
zest of 1 lemon
8 large egg yolks*
1/4 cup white sugar
pinch of salt
Turbinado sugar

Equipment
ramekins
kitchen torch
large baking dish
tea kettle
tongs
cooling rack

*Tip: Freeze the egg whites into individual ice cubes for future use.

Preheat oven to 325 Fahrenheit.
In a large mixing bowl, mix together egg yolks, white sugar and salt.
In a 1 quart pot, combine heavy cream and lemon zest.  Heat over medium flame until scalding hot but not boiling.
Baked custard filling
Whisk 1 tablespoon of the cream mixture into the egg yolk mixture.  Repeat 10 times.  This will help temper the egg yolks so that you don't end up with sweet scrambled eggs.  In a steady stream, whisk in the rest of the cream mixture.  Strain the mixture through a fine mesh sieve.
Boil water in a tea kettle.
Place the ramekins in the baking dish so that they lay flat.  Bake in separate batches if necessary.  I had to bake mine 3 ramekins at a time since I have a teeny tiny oven.
Ladle the custard into each ramekin.  Carefully place the baking dish in the oven.  With the tea kettle, fill the baking dish (not the ramekins) with enough water to cover the bottom half of the ramekins.  Be careful not to get any water into the ramekins.  This will create a water bath to ensure even baking.
Bake for 30-35 min.  The custard will be set.
Remove baking dish from oven.  Using tongs, place ramekins on cooling rack.  Once custard has cooled to room temperature, place ramekins in refrigerator.  Chill for at least 4 hours or overnight.
Right before serving, sprinkle turbinado sugar evenly over custard. Use the torch to melt and brown the sugar evenly.  If you do the brûlée part ahead of time and keep it in the fridge, the top will get soft and you won't get the satisfying crack when you first dig in.  
Top to bottom: Brûléed, brûléed, not brûléed

Enjoy!

Wednesday, February 5, 2014

Ground Beef Rice Claypot

Ground Beef Rice Claypot with Runny Egg 
I love one pot meals.  I love it even more when that meal can be eaten straight out of the pot it was cooked in.  Affordable, filling, simple and most importantly, flavorful.  Rice claypot meals are very popular in Hong Kong.  There are many different kinds, depending on the protein that is cooked over the rice: ground pork, chinese sausage, chicken, minced beef, vegetables, mushrooms, even seafood.  Here is one variation.
Ground Beef Rice Claypot
1/2 cup raw rice
1/2 cup water
1/4 lb. ground beef
1 tbsp cornstarch
1 handful of frozen vegetables
1 tbsp oyster sauce
1 tbsp oil
1 tsp soy sauce
1 tsp oyster sauce
pinch of sugar
1 tsp cornstarch
5 tbsp water
egg (optional)
small claypot w/ lid that can hold at least 2 cups of water
Soak claypot overnight or for at least 30 minutes in cold water.
Sprinkle the ground beef with cornstarch and mix well.  Mix 1 tbsp oyster sauce with beef.  Marinate in the refrigerator until ready to add to claypot.
Dry claypot.  Add raw rice and 1/2 cup water to claypot.  Bring rice to simmer for 8 minutes, or until most of the liquid has been absorbed.
Add frozen vegetables and ground beef mixture on top of rice.  Drizzle the oil onto the inside edges of the pot so that it will flow down to the bottom.  This will make the bottom of the rice crispy.  Cover and cook over low heat for about 10 minutes.
Mix the 1 tsp oyster sauce, soy sauce, sugar, cornstarch and 5 tbsp water together.  Pour over meat mixture.  If desired, make a well in the beef and crack an egg into the well.  Cover and let the residual heat cook the egg to your liking.  I recommend about 2 minutes for a runny yolk.  

Sunday, February 2, 2014

Loquat-Soy Glazed Wings

Loquat-Soy Glazed Wings
Loquat Preserves and Soy Sauce
A while back ago, one of my friends decided to make a batch of Loquat Preserves from the fruits of her loquat tree.  She very graciously reserved a jar for me.  She had warned me that it would be super sweet.
Used half the jar to make a simple marinade and glaze for a batch of oven baked wings.  I can't wait until the next time her tree bears fruit and she starts canning again.  Obviously, loquat preserves are not easy to come by, so feel free to substitute with any other fruit preserves.

Loquat-Soy Glazed Wings
12 chicken wings
12 cloves garlic, smashed and skin removed
1/2 cup loquat preserve
1/4 cup soy sauce
5 tbsp brandy

Combine brandy, loquat preserve and soy sauce in a medium pot with a lid.  Simmer and stir for about 10 minutes.  Let mixture cool.  Reserve half and set aside.
Add wings and garlic cloves to the pot.  Mix well to thoroughly coat the wings in the marinade.   Let sit  in the refrigerator for 1 hour.  The soy sauce penetrates into the wings pretty well, so it doesn't need to marinate for too long.
Preheat oven to 400 degrees F.  Spread wings out on a foil lined baking sheet so that they are not touching each other.  Bake for 20 minutes.
Heat remaining half of the mixture in a wok over low heat until thickened.  Toss the baked wings in the glaze to thoroughly coat and serve.


Wednesday, January 29, 2014

Beef Bone Stock


Daikon Noodle Soup with Beef Bone Stock 
Whenever I make Roasted Bone Marrow, I also make Beef Bone Stock with the bones that are leftover.  There are usually pieces that still have bits of bone marrow that I couldn't get to.  The knuckle pieces also contribute a lot of collagen to the stock, giving it more body.  It makes for a flavorful and robust soup base.  I like to add salt to taste as I use the stock instead of cooking it in.

Beef Bone Stock
3 lbs beef marrow and knuckle bones
filtered water

Place beef bones in a stock pot.  Add enough filtered water to fill the pot 3/4 of the way.  Cover pot and bring to a simmer.  Prop pot lid up to vent and keep at a barely simmer for 4-5 hours.  If it gets to a boil, the stock will be cloudy.  It doesn't affect the flavor, so don't worry about it if it happens.  Skim away the scum that rises up to the top every now and then.
Place a pot of equal size in an empty sink.  Fill the rest of the sink with ice.  Pour the stock into the empty pot through a sieve to strain out all the solids.  Discard the bones and solid bits.
Stir the stock to cool.  Drain the sink as ice melts.  Add more ice if necessary.  Cool stock to room temperature and pour into containers to store in the freezer.
I like to use mason jars as they are perfect for single serving sizes and have the measurement markers right one the sides.

Wednesday, January 22, 2014

Dau Sot Ca Chua (Tofu in Tomato Sauce)

Dau Sot Ca Chua (Tofu in Tomato Sauce)
Since my chinese mother grew up in Hanoi, I was blessed with both homemade Chinese and Vietnamese food during my childhood.  Dau Sot Ca Chua over a fluffy bowl of steamed rice was one of my favorite comfort foods growing up.  The tofu acts like a sponge and soaks up all the flavors of the sauce.

Dau Sot Ca Chua
1 lb. medium-firm tofu
5 large ripe tomatoes
1 medium yellow onion
1 tsp fish sauce
1/2 tsp sugar
salt to taste
2 tbsp oil for pan-frying
minced scallions for garnish, optional

Cut tofu into 1-inch cubes.  Drain tofu pieces on paper towels to remove excess moisture and minimize spatter.
While tofu is draining, julienne the onion.  Remove the stems and seeds from the tomatoes and dice.
In a large sauce pan, pan-fry the tofu cubes for 1-2 minutes on each side to a golden yellow.  Remove tofu from pan and set aside.
Add onions to pan and cook until translucent.  Add tomatoes and cook until soft.  Add a few tablespoons of water if too dry or if you want more sauce.  Stir in fish sauce and sugar.  Do a taste test.  If needed, add salt to taste.  Add tofu and let simmer for about 15 minutes.  Sprinkled with minced scallions.  Serve over steamed rice.
The flavor really soaks into the tofu if made one day prior to be reheated the next day.

Friday, January 17, 2014

Roasted Bell Pepper Soup

Roasted Bell Pepper Soup
Although we did not get hit with the polar vortex in southern California, I decided a few weeks ago that it was cold enough to qualify as "soup weather".  Our "cold spell" didn't last very long, so I had a very small window of opportunity for winter boots, scarves, comforting soups and hot beverages.
I made a small batch, enough for dinner and lunch the next day.  Unfortunately, I did not secure the lid of the container well and most of my lunchtime soup spilled all over my lunch bag.  That was my great tragedy of the day.  At least I got to enjoy half of it.
If you are not too picky about the color, any color bell pepper can be used.  Red, of course looks better, but I think green, yellow or orange also taste great.  I bought 2 green bell peppers and one of them turned red by the time I decided to use them for this recipe.  My soup came out a delicious golden yellow.

Roast Bell Pepper Soup
2 large bell peppers
1 small tomato
1 cup chicken or vegetable broth
1/2 small onion, diced
1 tsp butter
1/4 cup half & half
salt & white pepper to taste

Broil the whole bell peppers and tomato on a baking sheet for about 10 minutes.  Let cool and rub the skins off.  Remove and discard the stems and seeds.
Sautee the onion and butter in a large soup pot until translucent.  Add broth, bell peppers and tomatoes. Bring to a boil and let simmer for 10 minutes.  Remove from heat.
If you have a handheld blender, pulse the soup at the lowest speed setting until smooth.  Make sure that the pot has sides that are high enough so that the soup doesn't spill over.  Hot soup spilling all over you is not good.
If you are using a regular blender, make sure to let the soup cool to room temperature before blending.  Otherwise, the heat will cause the contents of the blender to expand during blending and hot soup may explode out of your blender.
Reheat soup to barely a simmer, stirring frequently.  Add half & half.  Stir until warmed through.  Remove from heat and add salt and white pepper to taste.  Enjoy!


Sunday, January 12, 2014

Stuffed Mushrooms

Stuffed Mushrooms
Once in a while, I would think about the stuffed mushrooms that was served at a get together that I had attended a few years ago.  I love mushrooms and were still thinking about them the next day.  The hostess recited the simple recipe when I asked what was in those delectable morsels.  Unfortunately, I never wrote it down.  So I put together a recipe based on what I think were the list of ingredients.  I think it came pretty close to the original.

Stuffed Mushrooms
12 large white button mushrooms
3/4 cup bread crumbs
1/4 cup parmesan cheese, freshly grated
3 tbsp parley leaves, finely minced
3 tbsp olive oil
1 tbsp olive oil
zest from 1/2 lemon

Preheat oven to 350 degrees F.
Wipe mushrooms clean with a wet paper towel.  Remove stems*.
If you have a Misto, lightly spray the bottom and sides of the mushroom caps with olive oil.  If not, toss the mushroom caps and 1 tbsp of olive oil in a large bowl until coated.
In a mixing bowl, combine bread crumbs, parmesan cheese, parsley and 3 tbsp olive oil.
Arrange mushroom caps on a baking sheet so that they hollow end up and are not touching.  With a spoon, fill the mushroom caps with the breadcrumb mixture.
Bake for about 10-15 minutes or until top of fillings are golden brown.  Remove from oven and sprinkle with lemon zest.

*Roasted mushroom stems add umami flavor to homemade vegetable stock.

Sunday, November 24, 2013

Spatchcock Roasted Cornish Hen

Spatchcocked Roasted Cornish Game Hen

I love making roast chicken.  But when cooking for one, a whole chicken is just too much sometimes.  Cornish game hens are the perfect size.  They take less time to cook, are elegant and have a great flavor.  Half the bird is the perfect serving size, I can save the other half for lunch the next day and I don't end up eating chicken for the next 3 days!  I also feel like a giant when I am eating my little chicken.
Even though cornish game hens cook faster, I still like the slow and low approach to keep the meat tender and skin crispy.  Spatchcocking the chicken reduces cooking time and promotes even cooking.  Dinner is ready in under an hour.
I like to vary the seasonings.  Sometimes it's with paprika, salt and pepper for a little (literally) paprikash chicken.  The paprika gives the skin a nice color and delicious drippings for the paprikash gravy.
My aunt gave me a box of Knorr Chicken Seasoning once.  It is sodium ladened, so I only had to use a few tablespoons from one package.
This time, I went for a simple thyme and sage rub with some fresh marjoram sprigs from my garden.

Spatchcocked Roasted Cornish Hen
1 cornish game hen
1/2 tbsp dried thyme
1/2 tbsp dried sage
5 sprigs fresh marjoram sprigs
1 tsp salt
1 tsp pepper
2 tbsp avocado oil

Preheat oven to 325 fahrenheit.  Using a pair of good kitchen shears, take the cornish game hen and cut alongside the backbone (from tail to neck).  In a small bowl, mix together the thyme, sage, salt and pepper.  Rub the avocado oil all over the hen (I used my beloved Misto).  Rub the herb mixture all over the hen.  Scatter the marjoram sprigs all over the bottom of a baking dish.  Place the seasoned hen, skin up, on top of the marjoram sprigs.  Wrap foil around the wingtips.  Roast for about 45 minutes or until the leg bone feels loose when you wiggle/tug on it.

Tuesday, October 1, 2013

Bone Marrow Endive Scoops and Roasted King Oyster Mushrooms


Bone Marrow Endive Scoops
This is a meal from a few months ago.  I picked up some nice looking Belgian endives from North Park Produce when I stopped to get fresh parsely for my decadent roasted bone marrow dinner.  They must not stock this often because the check out girl didn't know what they were.  She said that they looked different from the regulary endives that they usually sell.  Perhaps she was referring to curly endives?
I decided that this special item would make the perfect vessel for bone marrow.  The slight bitterness of these endives countered the rich bone marrow nicely.  At the last minute, I also opted for arugala that added a peppery bite.

Bone Marrow Endive Scoops
1 lbs beef bone marrow, roasted
1 Belgian endive
1 clove garlic, roasted
Arugala
1/2 lemon
1/4 cup cooked rice
salt & pepper to taste

Separate, wash and pat dry endive leaves.  Arrange the leaves on a platter.Slice the clove of roasted garlic. Layer a small portion of the following ingredients onto each leaf: rice, marrow, and a few small leaves of arugula. Squeeze lemon juice all over. Salt and pepper to taste. Enjoy!

I also roasted some king oyster mushrooms alongside the bone marrow for the last 5-8 minutes. The mushrooms soaked up the drippings and since they were so meaty, the outside carmelized beautifully without drying up.

Roasted King Oyster Mushrooms

Tuesday, June 11, 2013

Candied Bacon & Bailey's Ice Cream


Finally!  Success! Eureka!  I have figured out how to make Bailey's ice cream that will actually freeze into ice cream!  In my prior attempts, I have only managed to make Bailey's milkshake.  I was successful with my Malt & Nutella ice cream, which was non-alcoholic.  But since alcohol does not freeze well, I previous attempts at an alcoholic ice cream was thwarted by the laws of science.  Well, I don't give up that easily.  No matter how many batches of alcoholic milkshake I'd have to endure (which really isn't so bad).
See, my mistake was adding the alcohol component too early in the process. And now that I've figured out the secret, VICTORY IS MINE!
While I was at it, why not add some candied bacon as well?  The little piggy on my shot glass certainly approved.


Candied Bacon

thick cut bacon
raw cane sugar
 
Preheat oven to broil.  Line a baking sheet with foil.  Trust me, this will make the clean up so much easier.  
Place a rack over a foil lined baking sheet.  Coat each slice of bacon with raw cane sugar on both sides.  Shake off excess.  
Place each slice of sugared bacon flat on the rack, not touching each other.  

Broil in oven for about 5 minutes or until bacon is crispy.  Watch carefully because the sugar could burn very easily.
While the bacon is broiling, line another baking sheet with foil that is slightly crumpled.  

Once the bacon is ready to be removed from the oven, transfer the slices of bacon over to the other foil lined baking sheet to cool.  If you leave them on the rack, they will get stuck and be hard to remove.  The crumpling in the foil will help drain away excess grease as well.

Bailey's Ice Cream Recipe
1 cup whole milk
1 pint heavy cream
1/2 cup sugar
1 tsp vanilla extract
2 large eggs
3 oz Bailey's Irish Cream
candied bacon for garnish
Combine milk, cream, sugar and vanilla in a large saucepan.  Slowly bring to a boil over low-med heat, stirring occasionally.  

Beat the 2 eggs in a metal bowl.  One ladle at a time, very slowly add the hot milk mixture to the beaten eggs while whisking furiously.  Yes, furiously.  You want the hot milk mixture to gently temper the eggs without cooking them.
Once all the hot milk mixture is incorporated into the egg custard mixture, pour the custard mixture back into the pot and slowly bring to a gently simmer.  Do not let this boil.  Stir frequently with a wooden spoon until custard is at 170ºF or coats the back of the spoon.  Take mixture off heat.  Stir occasionally, letting custard cool to room temperature.  Cover and refrigerate for 1 to 3 hours.  The colder the mixture, the better.
Follow instructions of ice cream maker to turn the custard into ice cream!  Once the custard starts looking more like ice cream, slowly drizzle in the Bailey's.  Scoop the ice cream into a freezer safe container and freeze for at least 1 hour.
Either tear up the candied bacon to sprinkle on top of the ice cream or garnish each serving with a half slice (maybe even a whole slice) of candied bacon.  If you have enough candied bacon leftover from the "taste tests", do both.
Makes 4 cups of ice cream.


Thursday, June 6, 2013

Rosemary Pork Loin with Crispy Sort-Of-Cracklings

Rosemary Pork Loin
I say "sort-of-cracklings" because my pork loin didn't come with the skin on.  It only had the standard layer of fat that I would usually trim away, leaving only a thin layer to keep the meat moist.  This time, I decided to keep the fat and do a slow roast to render away most of the fat, leaving a crisp, crackling-like (or crack-like) layer on top.  I had to restrain myself from eating all of the sort-of-crackling by itself.
The long and slow roast at a lower temperature combined with what started out as a thick layer of fat resulted in the most tender pork loin that I have ever roasted.

Rosemary Pork Loin with Sort-of-Cracklings
1 1/2 lb pork loin w/ fat layer intact
4 tbsp fresh rosemary
1 tsp salt
pepper
*Optional: potatoes, carrots or other root vegetables

Preheat oven to 350 degrees F.  Rub pork loin with rosemary, salt and pepper.  Place in baking dish or roasting pan, fat side up.  Roast for 80-90 min.  *Optional: After 40 minutes, arrange root vegetables in the baking dish/roasting pan around the pork loin.  Toss the root vegetables around after 15 minutes.  The fat layer should have mostly rendered away, leaving only a thin, crispy layer.
Let rest for 10 minutes before slicing.  Do not skip this step, resting allows the juices to redistribute and keeps the meat moist.  Slicing without resting your meat will dry it out, as all the meat juices will leak out.  Center should be the slightest blush of pink or meat thermometer should read 145 degrees F.

Saturday, June 1, 2013

Roasted Bone Marrow Tacos

Roasted Bone Marrow Tacos
I scored some nice marrow bones at NorthGate Market for $1.79.  According to the label, they were sold for soup making, but were the perfect size for roasting.  They were nice and wide, perfect for scooping out every delectable morsel.
I was pretty excited about lunch and then I realized that I forgot to pick up a baguette to make the crostini that would be the vehicle for my meat butter.
I found some tortillas that I had frozen (because Pancho Villa packaged waaaay too many fresh made tortillas in one bundle).  That's when inspiration hit.  Roasted Bone Marrow Tacos!
Meat butter tastes  just as fantastic on a tortilla as it does on toast or crostini.  In fact, it does a much better job of holding everything together.

Roasted Bone Marrow Tacos
flour or corn tortillas
marrow bones cut into 2 1/2 to 3" sections or split lengthwise
cold salted water
sea salt
grapeseed oil or olive oil (not the good stuff)
parsley
lemon
shallot, thinly sliced
Soak marrow bones in cold salted water for about 20 minutes.  Preheat oven to 375 degrees Fahrenheit.  Pat marrow bones dry. Rub with oil and lightly sprinkle with sea salt.  Arrange on baking dish so that the widest end of the marrow bones are facing down.  If the bones are split lengthwise, the marrow part should face up.  Roast for about 20 minutes, depending on the thickness of the bone.  When done, the marrow should form a golden brown crust on top and be cooked through but not melt.  If the marrow is melting, then it is overcooked.
While the bones are roasting, use kitchen shears to cut the parsley leaves into a bowl. Toss with the shallots and juice from the lemon.  Warm up the tortillas.
Scoop the marrow onto the tortillas and top with a bit of parsley salad.